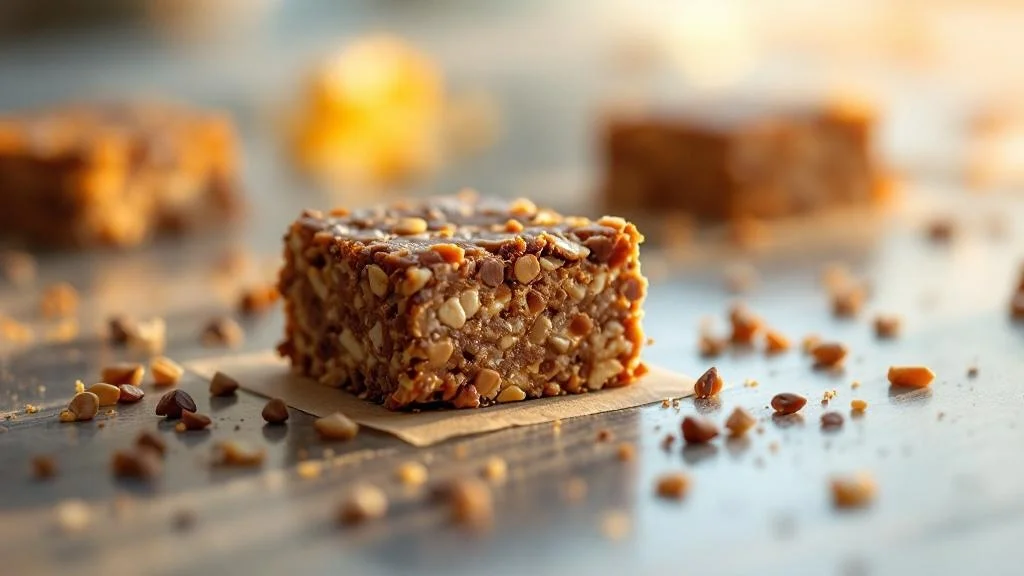
Vegan homemade protein bars changed my entire relationship with snacking, and honestly? I never saw it coming. I used to spend close to $40 a month on those fancy store-bought bars, the ones with the clean labels and the Instagram-worthy packaging, only to flip them over and find a paragraph of ingredients I couldn’t pronounce. One afternoon last January, right after my New Year’s commitment to eat cleaner, I decided enough was enough. I made my first batch at home. And my roommate, who is the most skeptical person I know, ate three in one sitting and asked me to text her the recipe.
That moment hooked me. Because making your own bars isn’t just about saving money, though you absolutely will. It’s about knowing exactly what’s in every single bite. You control the protein source, the sweetness, the texture. And once you nail the basics, the flavor combinations are basically endless.
If you’re just getting started, I’d really recommend checking out this complete collection of high-protein homemade snack ideas on the site, it’s packed with inspiration beyond just bars. But right now, let’s get into everything I’ve learned about making these work perfectly every single time.

Why Most Vegan Protein Bars Fall Apart (And How to Fix It)
Here’s the thing nobody tells you when you first start making vegan homemade protein bars at home. It’s not the ingredients that trip you up. It’s the ratios. I learned this the hard way when my first three batches basically crumbled the second I touched them. Full crumble. Into dust. I was so frustrated I almost gave up entirely.
See also: Homemade Protein Bars No Bake for related context.
The culprit is almost always an imbalance between your dry ingredients and your binding agents. Too much protein powder and oats without enough wet, fatty binders means your bars will fall apart every single time. Get the ratio right and they hold together like a dream. Even straight out of the fridge.
What binding ingredients actually keep no-bake bars from crumbling
The real MVPs in any no-bake bar recipe are your binders. And they have to do two jobs at once: hold everything together AND taste good. The most reliable ones I’ve tested are nut butters (more on those in a second), medjool dates blended smooth, maple syrup, and coconut oil.
Dates are honestly underrated here. When you blend 10-12 medjool dates into a paste, you get this sticky, naturally sweet glue that works incredibly well. I combine it with a tablespoon of coconut oil and the bars hold their shape even at room temperature for a couple of hours. A mashed ripe banana can also work if you don’t have dates, though it does add a little banana flavor to everything.
The rule I follow: for every 2 cups of dry ingredients, you need at least 3/4 cup of combined wet binders. If your bars still crumble after chilling, just add another tablespoon of nut butter or a splash of maple syrup, mix again, and press back down. Totally fixable.
How nut butter ratios change everything in vegan homemade protein bars
Nut butter is the backbone of most easy homemade protein bars, and the ratio really does make or break the final texture. Too little and the bars crumble. Too much and they become this dense, greasy slab that’s hard to eat without feeling a little heavy afterward.
My sweet spot: 1/2 cup of nut butter per 1.5 cups of combined dry ingredients. That gives you a bar that’s firm after chilling but still has a slight chew to it. Peanut butter gives the most neutral flavor. Almond butter is a little sweeter and adds a creamier texture. Cashew butter is my personal favorite for a more indulgent feel, though it’s pricier.
One trick I swear by: warm your nut butter slightly before mixing. Just 20 seconds in the microwave makes it pour like liquid and coat every dry ingredient evenly. The difference in texture is genuinely noticeable.
- Always line your pan with parchment paper AND lightly grease it, bars will release cleanly every single time.
- If your mixture feels too dry to press, add nut butter one tablespoon at a time rather than dumping more in at once.
- Press your bars down HARD, use the flat bottom of a measuring cup for even compression.
- Chill before slicing, always, even if the top looks firm after 30 minutes.
- Room temperature nut butter blends way more evenly than cold butter straight from the fridge.
Exact Protein Count Per Bar: The Breakdown Nobody Shows You
This is the part that most recipe blogs skip, and it drives me a little crazy. You see “high protein!” plastered all over a recipe but zero actual numbers. So I started doing my own math, and the results genuinely surprised me. Healthy homemade protein bars can absolutely compete with store-bought bars on protein, and often win.
How much protein does a homemade vegan bar actually deliver per serving
A typical batch of vegan homemade protein bars, cut into 12 pieces, will land somewhere between 8 and 15 grams of protein per bar depending on the ingredients you use. The biggest variable is whether you include a plant-based protein powder or not.
Here’s a quick breakdown of what a standard batch looks like nutritionally, using pea protein powder, oats, peanut butter, and maple syrup:
| Ingredient | Protein Per Batch | Protein Per Bar (12 cuts) |
|---|---|---|
| 1 cup pea protein powder | ~80g | ~6.7g |
| 1 cup rolled oats | ~10g | ~0.8g |
| 1/2 cup peanut butter | ~28g | ~2.3g |
| 2 tbsp hemp seeds | ~6g | ~0.5g |
| TOTAL | ~124g | ~10.3g |
Add a handful of pumpkin seeds or an extra scoop of protein powder and you’re easily pushing 13-14 grams per bar. That genuinely rivals a $3.50 store bar.
Which plant-based protein powders pack the most grams without chalky taste
Chalky protein powder is the thing that ruins homemade protein bars for a lot of people. I’ve been there. There’s nothing worse than biting into a bar that tastes like chalk dust with a hint of chocolate. But the powder you choose makes an enormous difference.
Pea protein is my top pick for no-bake bars. It blends smoothly, doesn’t overpower other flavors, and delivers around 20-24g of protein per scoop. Brown rice protein is another solid option, slightly grainier but very neutral in taste. Hemp protein has an earthier flavor that works beautifully in bars with dark chocolate and nuts.
According to research on plant-based protein digestibility and bioavailability, pea protein compares favorably to whey in terms of muscle protein synthesis when consumed in adequate amounts. So you’re not sacrificing results by going plant-based here.
The one I genuinely avoid in no-bake recipes: soy protein isolate. It goes chalky so fast and the texture in cold bars is just not pleasant. Save soy protein for baked versions where the heat integrates it better.
- Calories: 185-210 kcal
- Protein: 10-14g
- Carbohydrates: 18-22g
- Fat: 8-11g
- Fiber: 3-4g
- Sugar: 6-9g (from natural sources)
No-Bake vs Baked Vegan Protein Bars: Which One Wins Nutritionally
This debate comes up constantly whenever I talk about vegan homemade protein bars in online communities. And honestly, both sides have a real argument. So let me just break it down clearly based on what I’ve actually tested in my own kitchen.
Does baking destroy protein content in plant-based protein bars
Short answer: a little, yes. But probably not as much as you’d worry about. Protein does denature when exposed to heat, meaning the molecular structure changes. But denatured protein is still protein. Your body digests it just fine, and the amino acid profile stays intact.
Where baking actually hurts you more is in the calorie math. Baked plant-based protein bars often need more binding agents like flax eggs or banana to hold together in the oven, which adds calories without adding significant protein. So per gram of protein, no-bake versions tend to be slightly more efficient.
That said, baked bars have a chewy, almost cookie-like texture that some people genuinely prefer. And they work better if you want to use oat flour or almond flour as your base instead of rolled oats.
Why no-bake homemade protein bars dominate for easy weeknight prep
Look, I’m a realistic person. On a Tuesday night after work, I’m not turning on the oven for 40 minutes to make snacks. That’s where homemade protein bars no bake completely wins the argument for me, every single time.
No-bake bars take 15 minutes of active prep. You mix, press, and chill. That’s it. They’re ready by morning and they last all week. I’ve made a batch every Sunday for the past four months and it genuinely takes less time than my morning coffee routine.
For a detailed walkthrough of the no-bake method with troubleshooting tips, this step-by-step guide to no-bake protein bars covers every stage really clearly. Especially helpful if it’s your first time pressing a bar into a pan and hoping it holds together (we’ve all been there).
The texture you get from no-bake is also hard to beat. Fudgy, dense, slightly chewy. It’s closer to a Larabar or a RXBAR than a baked oatmeal bar, and that’s exactly what most people are reaching for when they want something satisfying.
Allergen-Free Vegan Protein Bar Recipes That Actually Taste Amazing
This section is close to my heart because I have a close friend with both a tree nut allergy and celiac disease, and for a long time I thought there was just no bar I could make that she could eat. I was wrong. It took some experimenting, but I eventually landed on combinations that are completely allergen-free and sooo good that honestly everyone prefers them.
Can you make vegan protein bars without nuts, gluten, or soy
Yes! Absolutely yes. And they don’t have to taste like cardboard either. The key is swapping out each problematic ingredient with a plant-based alternative that brings similar binding power and flavor.
For gluten-free bars, use certified gluten-free rolled oats or replace oats entirely with quinoa flakes or buckwheat groats. Both have a slightly nuttier flavor that works really well with chocolate. For soy-free protein, pea protein and hemp protein are both naturally soy-free and widely available. For nut-free versions, you just need the right seed-based swap, which I’ll cover in the next section.
The real game changer for allergen-free bars is sunflower seed butter. It behaves almost identically to peanut butter in recipes, binds just as well, and has a mild nutty flavor that most people can’t immediately identify as seed butter. Total game changer.
Best seed-based swaps for peanut butter in homemade protein bars
When you need a nut-free option for homemade protein bars with peanut butter, here are the swaps I reach for most often. All of these work in a 1:1 ratio so no math needed:
- Sunflower seed butter: Creamiest texture, most neutral flavor. Works in literally every bar recipe I’ve tried.
- Tahini (sesame paste): Slightly bitter, pairs incredibly with chocolate and dates. My personal favorite for a more sophisticated flavor profile.
- Pumpkin seed butter: Earthier taste, beautiful green color, high in zinc and magnesium. Great for savory-leaning bars.
- Watermelon seed butter: This one sounds weird, I know. But it’s mild, creamy, and nut-free. Harder to find but worth it.
One heads up with sunflower seed butter specifically: it can turn baked bars greenish due to a reaction between chlorogenic acid and baking soda. Doesn’t happen in no-bake recipes, just something to know if you go the baked route.
Seed butters have deep roots in Middle Eastern and African culinary traditions, where sesame and pumpkin seeds have been pressed into pastes for centuries. Today they’re becoming a mainstream swap in Western allergen-free cooking, especially in the plant-based snack space.
The Ultimate Storage Guide: Keep Bars Fresh Up to 3 Months
Making a big batch of healthy homemade protein bars feels incredible until you realize you made 24 bars for one person and have no idea how to store them all. I’ve been there. And I’ve had batches go stale, go soft, and pick up freezer odors because I didn’t wrap them properly. Here’s everything I’ve figured out.
How long do homemade vegan protein bars stay fresh in the fridge vs freezer
| Storage Method | Duration | Best For |
|---|---|---|
| Room temperature (airtight) | 5-7 days | Grab-and-go daily snacks |
| Refrigerator (airtight) | 2-3 weeks | Weekly meal prep batches |
| Freezer (wrapped individually) | Up to 3 months | Bulk batch cooking, January meal prep |
For vegan homemade protein bars that contain fresh fruit or high moisture ingredients like mashed banana, stick to the fridge and use them within 10 days. The higher the moisture content, the shorter the shelf life, it’s that simple.
Bars made with primarily nut butter, protein powder, and oats are the most shelf-stable and freeze beautifully. They also thaw in about 30-40 minutes at room temperature, which makes them perfect for packing in a lunch bag in the morning.
What wrapping method prevents freezer burn and texture loss
I tried storing bars directly in a zip-lock bag once. Bad idea. They stuck together, got icy on the edges, and the texture was off when I thawed them. Now I do this instead and it works perfectly every time:
- Let bars chill completely in the fridge (at least 2 hours, ideally overnight).
- Wrap each bar individually in a small piece of parchment paper, then wrap again tightly in plastic wrap.
- Place wrapped bars in a single layer in a freezer-safe container or zip-lock bag with as much air removed as possible.
- Label with the date and flavor. Seriously, do this. Three months later you will not remember what’s in there.
The double-wrap method is the key. Parchment prevents sticking, plastic wrap seals out air, and the container protects against freezer odors. Your bars will taste just as good on week 10 as they did on day one.
The One Chilling Trick That Makes Vegan Bars Taste Store-Bought
Okay, this is the part I’m most excited to share. Because this single technique, which I stumbled onto completely by accident, is what finally made my vegan homemade protein bars go from “homemade and you can tell” to “wait, did you actually make these?” That reaction from my neighbor the first time I brought some over? Priceless.
Why a 90-minute freeze before slicing completely transforms bar texture
Most recipes tell you to refrigerate your bars for 2 hours before slicing. And that works fine. But here’s what nobody talks about: if you put your bars in the freezer for 90 minutes instead, before slicing, the texture becomes completely different.
The freeze firms up the nut butter and coconut oil into a solid, cohesive structure. When you slice through it, the edges are perfectly clean, no dragging, no crumbling. The bars look like they came off a factory line. And when they come back up to fridge temperature over the next hour, that structure stays. The bite is firmer, more satisfying, and the layers (if you added a chocolate drizzle on top) stay completely intact.
I discovered this by accident one day when I forgot my bars in the freezer and ended up leaving them for 90 minutes instead of my usual 2-hour fridge chill. When I pulled them out and cut them… I actually said “oh wow” out loud to nobody. The difference was immediately visible.
How this single discovery cut my recipe failures by more than half
Before I started using the 90-minute freeze trick, I’d say maybe 40% of my batches had some kind of texture problem. Either too soft to slice cleanly, or crumbly at the edges, or the chocolate topping would drag and smear.
After switching to the pre-slice freeze? My failure rate dropped dramatically. I honestly think it’s the single biggest improvement I’ve made to my process, more impactful than any ingredient swap or ratio tweak. And it costs you nothing, just 90 extra minutes of patience.
If you’re making homemade protein bars for weight loss or meal prep reasons and you want them to look as good as they taste, this trick is non-negotiable. Presentation actually matters for consistency because when your bars look appealing, you’re more likely to grab one instead of reaching for something less intentional.
- Use a sharp chef’s knife (not serrated) to slice frozen bars, you’ll get the cleanest cuts every time.
- Run the knife under hot water and wipe dry before each cut for ultra-clean edges.
- For a shiny chocolate topping, let the melted chocolate cool slightly (about 90 seconds) before pouring over the pressed bar layer.
- After slicing, return bars to the fridge for 15 more minutes, the cut edges will firm up beautifully.
I started making vegan homemade protein bars back in January 2023 during a week when I was genuinely overwhelmed by how much money I was spending on store-bought snacks. My first batch was a disaster, I used too much protein powder, not enough nut butter, and the bars basically disintegrated when I tried to unwrap them. But I kept going. Over the next six months I tested probably 30 different variations, adjusting ratios, trying different protein powders, experimenting with seed butters and date pastes. I kept notes like a maniac. What you’re reading here is the distilled result of all that trial and error, the stuff that actually works in a real home kitchen with real ingredients and real time constraints. Not a test kitchen. Just me, my tiny apartment counter, and a lot of protein powder.
Yes, absolutely. You can make delicious homemade protein bars without protein powder by leaning heavily on whole-food protein sources like hemp seeds, pumpkin seeds, sunflower seeds, and nut butters. A combination of 1/2 cup peanut butter, 3 tablespoons hemp seeds, and 2 tablespoons pumpkin seeds per batch will give you roughly 6-8 grams of protein per bar. They won’t hit 12-14g like a powder-based bar, but they’re whole-food dense, naturally sweetened, and incredibly satisfying.
Frequently Asked Questions About Vegan Homemade Protein Bars
The key is the right ratio of wet to dry ingredients plus solid binding agents. Use nut butters or coconut oil as your base (at least 1/2 cup per 1.5 cups dry ingredients), mix in protein powder and oats, then press firmly into a lined 8×8 pan. Refrigerate at least 2 hours before slicing. If bars still crumble, add 1-2 tablespoons of nut butter or a splash of maple syrup and press again. A 90-minute pre-slice freeze makes a huge difference too.
Store bars in an airtight container at room temperature for 5-7 days, in the refrigerator for up to 3 weeks, or individually wrapped in the freezer for up to 3 months. Always wrap each bar in parchment then plastic wrap before freezing to prevent freezer burn and sticking. Label with the date made so you know exactly when to use them by.
Absolutely. Nut butters swap 1:1 with each other or with seed butters like sunflower or tahini. Replace oats with almond flour or quinoa flakes (use 25% less since flour absorbs more moisture). Sweeteners like maple syrup, honey, and dates are interchangeable by volume. Coconut oil can be swapped with avocado oil in equal amounts. Just keep in mind that some swaps may slightly change texture or shelf life, so adjust as you go.
Room temperature: 5-7 days in an airtight container. Refrigerated: 2-3 weeks. Frozen: up to 3 months when properly wrapped. Bars with fresh fruit or high moisture ingredients will have a shorter lifespan, so keep those refrigerated and use within 10 days. Higher fat content (more nut butter or coconut oil) actually helps preserve bars longer than lower-fat versions.
A typical batch using 1 cup of plant-based protein powder cut into 12 bars yields roughly 10-14 grams of protein per bar. Pea protein powder provides about 80g per cup total for the batch. Add hemp seeds, pumpkin seeds, or an extra half scoop of powder to push per-bar protein higher. Without protein powder, expect 6-8g per bar from whole-food sources like nut butters and seeds.
No-bake bars take 15 minutes of prep plus chilling time. They’re fudgy, dense, and rely on nut butters and coconut oil for binding. Baked bars take 30-40 minutes total and produce a chewier, more cake-like texture. No-bake wins for convenience and whole-food ingredients. Baked bars work better with oat flour and are easier to make in larger batches without pressing. Both methods produce comparable protein content per bar.
Wrapping Up: Your Turn to Make Vegan Protein Bars
Making vegan homemade protein bars at home is genuinely one of the best habits I’ve built into my weekly routine. Not just for the nutrition, though that’s a huge part of it. But for the sense of control it gives me over what I’m actually putting in my body, and honestly, for the quiet satisfaction of pulling a batch out of the freezer on a Monday morning and knowing the whole week’s snacks are sorted.
Start with the basics: a good nut butter (or seed butter if you need nut-free), your favorite plant protein powder, rolled oats, and a natural sweetener. Get the ratios right, use the 90-minute freeze trick before slicing, and store them properly. That’s genuinely all it takes to make bars that rival anything you’d buy for $3-4 at a health food store.
If you want even more variety and ideas beyond what we covered here, browse all my healthy high-protein recipes for more plant-based snack inspiration. There are always new ideas being added and plenty of options for every dietary need.
Save this article before it disappears from your feed, because once you start making these, you’re going to want to come back and try every variation. Trust me on that one.
Want to know more about my approach to healthy eating and why I started this site? Head over to my About page for the full story. And if you have questions, ingredient swaps you want advice on, or just want to share how your batch turned out, I’d genuinely love to hear from you on my Contact page.
Leave a Reply